Setting up Follow-You printing on a Mac
We recommend that wherever possible you use internet printing.
Follow-You printing
Follow-You printing can be released on any Ricoh MFD. Save the three following open source disc image files (.dmg) to your download or folder of your choice:
Once you have saved the files:
- Navigate to the folder where your files are savedDouble-click on gplgs-8.71.dmg (GhostScript 8.71)
A disk image is mounted and a window displays the contents of the folder:

- Double-click on the package named GPL Ghostscript.mpkg
- Keep clicking the Continue button and accept the licence agreement when necessary
- Click on the Install button & enter your administrator account password (this may be your main account)
- After receiving confirmation that the installation was successful, click on the Close button.
Next:
- Double-click on foomatic-rip-4.0.6.230.dmg (print filter)
- A window will appear displaying the contents of the folder:

- Double-click on Foomatic-RIP.pkg
- Keep clicking the Continue button and accept the licence agreement when necessary
- Click the Install button & again enter your administrator password
- After receiving confirmation that the installation was successful, click the Close button.
Next:
- Double-click on pxlmono-1.9.dmg
- A window will appear displaying the contents of the folder

- Double-click on the package named pxlmono.pkg
- Keep clicking the Continue button
- Select the language if other than English
You can now eject the disc images by clicking on them.
Setting up Follow-You printing
- From System Preferences click Network, then Advanced, then on the WINS tab, change the Workgroup field to LIVAD
- From the Apple menu, select System Preferences....
- In System Preferences, from the View menu, select Print & Fax
- Click the + (plus sign) to add a new printer then the Advanced icon (highlighted below)

If the Advanced icon is not present press Ctrl key then click on the toolbar. Choose Customize ToolBar, then drag the Advanced icon onto the toolbar
- Change Type: to Windows (it defaults to Bluetooth as shown above)
- In the URL: box enter :
- smb://print1.liv.ac.uk/staffqueuenorth if you are usually located in the North of the Campus or not on the main Campus
- or smb://print2.liv.ac.uk/staffqueuesouth if you are usually located in the South or Central Campus
- or smb://lonprint01.livad.liv.ac.uk/lonprint if you are based in London
- Give the printer a descriptive name – it recommended you use the same name as the queue:

You will need to select a print queue from the list. The following option will allow you to print in colour, black and white and with special finishes such as stapling or folding.
- From Print Using: choose Select Printer Software
- Select the Ricoh Aficio MP C7501 PXL
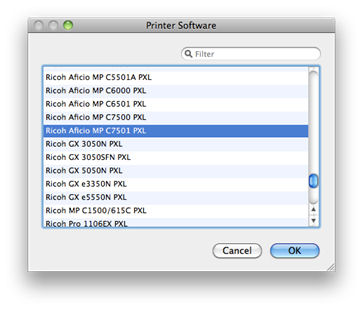
- Click Add
- Add the SR5000 finisher (you can change this later if it does not have a function that you need and a Ricoh MFD supports)

The first time you submit something to print you should get asked for your MWS username (in the format livad\username), password (not that of your Mac), and if you want to add this to your keychain. If you add it to your keychain you will not get asked in the future.
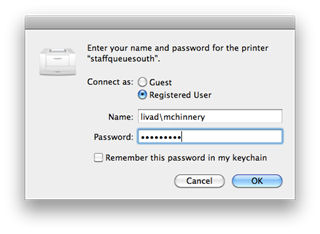
If this does not appear click on the printer icon in your Dock. The job should be listed as On hold because Authentication Required. Click on the job to highlight it then click on the Resume icon. The authentication window should appear.
When printing a document, if you choose the Printer Features option menu item as shown below you can toggle colour or black and white as well as choose the different finishing options

Choose Layout from the same menu to choose duplex (2 sided) printing